April 2006
4/4/06--On the way home from work, I stopped at B&G machine shop in Alvin, and talked with Greg and he has me leaning toward using my current block and going 347. He gave me a list of parts I should buy and a website that will sell them at good prices in a package. He says since I have the best iron heads already, and headers, intake, and carb, then I may as well use the same block and then only pay the $350 or so to have him machine it to fit. He also said that the GT40P heads are GREAT on a 347, and if I ever upgraded to aluminum heads (specifically AFRs), it would only run better. He said to bring in all the rotating assembly and my block and he can turn it around balanced and assembled in 3 days.
On Sunday, Anna and I drove to Cypress and met with Rick Book, who I have been conversing with on the forum for the past 2 years or so. Really nice guy who has a fast 347 with slicks, EFI, and roll cage. He made a fiberglass hood with a 4" cowl, like the old 60s model Camaros had. When he did this, he had a scoop he was wanting to sell, so I gave him $100. It is a little bigger than what I really wanted (really, I wanted that cowl) but will give me an opportunity to do some cutting and fabricating on some metal.
When I got home today, I tore into the donor hood to get the new scoop on. Measured so that the hole in the hood would be centered over the carb, and made an 11" hole, much bigger than the existing air cleaner, but I figured I could put a round air cleaner on it and it would still fit inside it. To line up the holes to bolt the scoop on, I got inside the hood and dripped elmers glue in the hole, and punched and drilled where the glue dropped onto the hood.
The bolts I bought were too long, and it was too late to buy more when I got all this done, so new bolts tomorrow and ready to go. I will make a box that fits under the air cleaner and fits with foam snug to the bottom of the hood so that only cool outside air will be able to get into the carb, and no hot air from inside the engine bay. I have the aluminum to make the pan, but not the time or foam, yet. Might just use those swimming pool Noodles or similar, or pipe insulation. Something that will easily compress when the hood is closed on it, but won't flex the pan or hood.
4/11/06--Got a new cable internet connection today, and can now use FTP to upload my stuff rather than the crappy SBC Yahoo File Manager.
As far as the car...I have the distributor and voltage regulator off, and will try to put a one-wire alternator on instead, possibly 100 AMP chrome job from jegs. I put in a "kill switch" at the rear of the car and ran the hot recharging wire to the switch so the car would die when the switch was put to "OFF" rather than continue running with from the alternator power. I initially used 14 gauge wire from the hot side of the alternator, but took it off and put in 10 gauge instead, as it will need to handle higher amperage than 14 can handle.
4/14/06--Got a 63amp NAPA remanufactured one-wire "GM" alternator, and they took my stock alt as a core exchange. Cost only $40.58 after core exchange. The JEGS 1-wire was going to be more like $160, so, since I don't think I need that kind of power right now, I settled for 63 amps, which is 10 or 15 amps more than stock. The stock was made for an A/C car with stereo, so the extra amps should be more than enough, at least for right now.
I was able to remove the old voltage regulator and all the wiring that goes to it, so the fender is much cleaner. I went ahead and replaced the starter solenoid since I broke one of the terminals off last week.
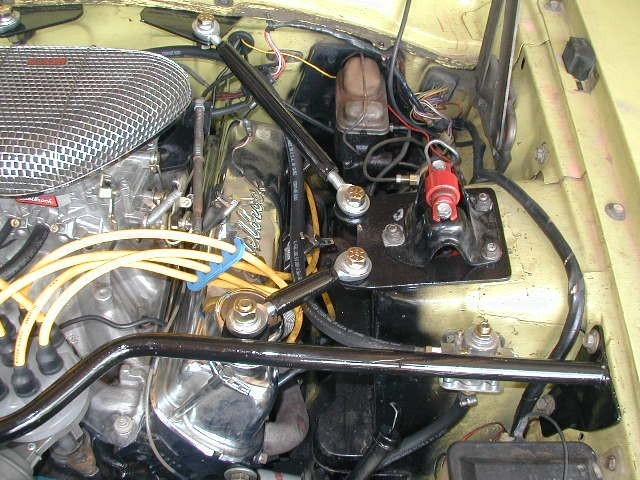
To install the new alternator, I had to drill out the top mounting hole since it was too small for my 7/16" bolt. Then, since the mounting tab at the top was about half as thick as my stock one, I had to fabricate a new spacer. If you look really closely at the picture, you might be able to make out that the spacer is a 1/2" deep spark plug socket drilled out and cut down to 2-1/2" to function as the spacer (under the heater hose in picture). I had to buy a $1.50 plug for the alternator, since it had two flat electric connections on the bottom. The screw-on connection went to the red 10 gauge wire that goes to the battery (actually, to the battery side of the kill switch). The number 2 flat wire connector was another 8 gauge wire that jumps over to the battery charging red wire post. The number 1 flat connection is a white wire that is currently hanging loose, but is to be connected to the "ALT" light on the dash, sometimes referred to as the "idiot light". I am not too worried about it, since I have a voltage meter in the car and I can keep an eye on the current in there. I might hook the wire up when I get under the car to clean up the wires and mount them securely, just so it isn't hanging loose.
4/16/06--I started to take apart the new door, and recognized that I never documented Monte Carlo bar installation. It went in pretty easy. Had to force some bolts in, just because everything fit tight, but once it was all installed, they look great, function very well, clean up some of the under hood clutter, and when you put your weight on them, there is no flex or twist across the front end. These should stiffen up the entire front suspension quite well.

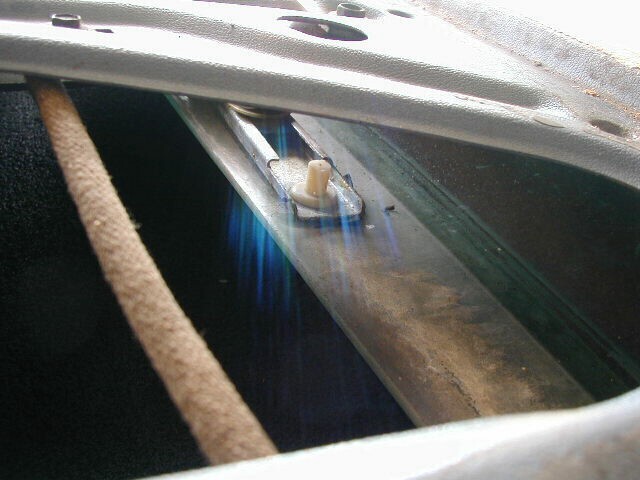
As for door progress, I have taken out the window glass by popping out two round pins (push them downward with a hammer and punch) that hold it to the lifting frame, then sliding the glass up and inward starting with the rear first at a 45 degree angle. Then took apart all of the opening handle and locking mechanism. I am still trying to figure out if I need to do some surface prep to the inside of the door where there is a very light surface rust (perfect for adhesion of POR-15) and some bedliner type material at the bottom half, which may or may not need to be removed. It got hot so I stopped for the day (85+ at noon on Easter is too damned hot!).


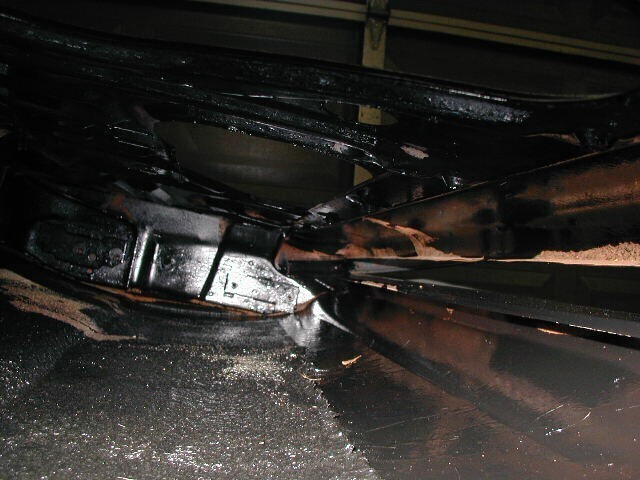
4/17/06--I took the weather stripping off the door, then disassembled the remainder, including the window crank. It had to be pulled most of the way out of the window opening, the backed out the largest hole in the center of the door. Kinda like a Rubik's cube, but workable. I used POR-15 in side the entire door, and on the bottom of the outside (where the rust tends to form), then finished off the cup of POR-15 by wiping down the inside of the door that has the armrest and paneling on it.
I was working blindly, inside the door, with a paintbrush, so I could not tell exactly where I had hit with the POR-15. After it all dried, I put the camera inside the door and snapped a shot, and can see a couple of places that I just cannot reach. Most importantly, I put a really good thick layer at the bottom, and at all the places where the two door panels come together. These are the rust prone areas.

4/20/06--I put a second coat of POR-15 on the door inside and out, and took the fender off the passenger side. Cleaned the new fender up and pounded out some of the dents and straightened out the bottom mounting tabs, then double-coated POR-15 on the inside, bottom, and behind the headlights on it. Had to buy a second can of POR-15. Didn't think it would last long, but the guy that sold it to me told me to drill two holes in the top, put in a screw, then keep it refrigerated. I gave a good portion to my dad so he could do some rust work on both his cars, figuring it would kick off before I had a chance to use it all. Well, it keeps well in the fridge, and I used 2 screws with little rubber washers, so they keep it sealed good when closed. For the fender, I just poured it on and brushed it around, rather than waste what is left over in the little can I would pour it into.
I borrowed my parents' pressure washer and hit all the loose mud and grease off all the passenger side of the exposed door/fender area. Knocked off 20 years worth of mud and wasps nests.
Was going to start reassembling today, after I put some more pickets on the fence (see bottom left picture) but we got a nasty storm this morning with 60 mph winds and it flooded the yard, so no fence work, and it was WAY too humid to work in the garage. But, other than hinges and hardware swap (handles, locks, etc.) the door is ready to install and the fender is ready. I need to clean up the headlight dish and probably buy new lights.
4/23/06--Got to work on the inner fender well today. Finished up the first can of POR-15 on the entire inside of the fender well, and the front portions of the frame around the radiator. I spent hours chipping and grinding away at years worth of grease and dirt on the suspension parts, including the A-Arms. These pictures only show the first coat of POR-15, second coat tends to smooth the bumps and creases out more.

4/31/06--OK, I am cheating a little...it really is 5/1 but I didn't want to start a new page...just wanted to finish this one up in April.
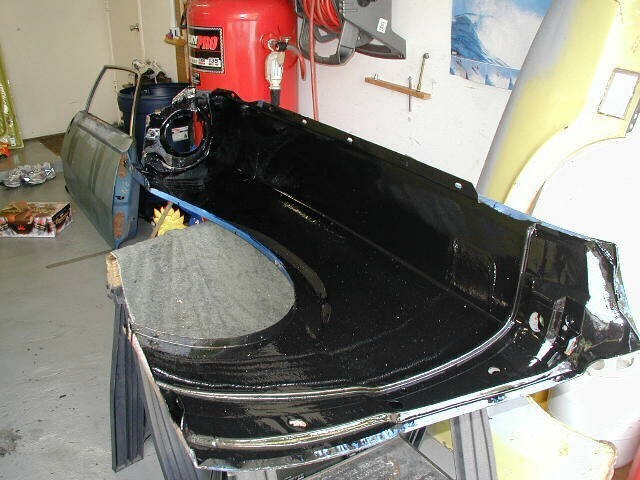
I finally got the door and fender on. The door needs just a little more adjustment to bring the front edge closer to the body to line up with the fender better, but it is definitely drivable now. I put POR-15 on the entire front clip and underneath all the way back to the suspension. I first wirebrushed it down to the metal and got all the grease and grime off, then painted a nice thick coat on. I will put a second coat on before I reassemble the front valence, grill, etc.
The passenger door is not yet complete. I still have the window and crank mechanism out, and the inside door handle is not installed. I have the arm rest in and the outside handle, and the lock, but the inner door panel and door opening handle will not fit on this door. It was originally made to have a handle attached to the arm rest, and a smaller armrest. So, I will leave the window, seals, and crank out until I can buy a welder and cut the front 1/3 of the metal inner door panel out and weld it into this door so all the remaining parts will fit. So, for the next 3 months or so, no window, no door panel, and have to open the door from the outside.
I also reinstalled the transmission cooler, centered on the radiator and off the grill. Shortened the lines so they aren't hanging too far down and not rubbing on any sharp edges.

total = 5479.74